Video: https://youtu.be/pv93k-Alwzk
Transcript:
The title blocks automatically associated with the worksheet space in Envisioneer are 24×36 pieces of paper, but these sheets can be any size. Part of your default catalog with Envisioneer includes several sizes of title blocks you can insert.
Insert a new Titleblock
1. Select Insert > Import CAD File or click the Import CAD File button on the Insert toolbar.
2. In the Open dialog, double-click the Title Blocks folder.
3. Select the D1-size.dwg file, then click Open. The Import dialog appears.
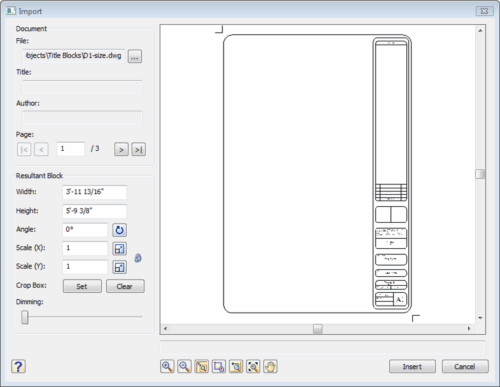
4. Click Insert.
5. In the Edit Block Attributes dialog, you can edit any text associated with the title block. Click OK to accept the default attribute values.
6. Left-click to insert the title block in the worksheet drawing area.
7. Use the Zoom to Fit tool to maximize the view of the title block.
Title blocks consist of lines, text, images, and attributes. You can edit its individual components or add objects to it. Any changes or additions you make are automatically saved to the block’s definition, and any instances of the block in your entire project are automatically updated.
To edit a title block:
1. Left-click on any line or text in the title block to select it. In the Object Properties panel to the right, click Edit in the Definition field.
2. The title block will become separate entities. You can move, erase or add lines to it. Click the ESC key to meld it back together as one entity.
3. Select Edit in the Attributes field to change the text originally displayed in the Block Attributes dialog box when you first inserted the titleblock.